[Tutorial] Pritunl with Nginx reverse proxy & Let’s Encrypt
Pritunl, with it’s easiest setup mode is a plug’n’play self-hosted VPN service that’s been built on top of OpenVPN. However it can also be used as an enterprise distributed OpenVPN and IPsec server.
Since most folks would use it for a self-hosted VPN service I will only focus in this tutorial on the single server version.
I will not go into the installation details for Pritunl as the full installation details for each supported distro are available here.
Also I will assume that you’re running something else besides Pritunl on the same server, or that you’ve already setup Nginx and issued Let’s Encrypt SSL certificate for your hostname.
If you haven’t done it already and need instructions, you can find detailed instructions for installing Nginx and Certbot for different operating systems.
Pritunl offers a web interface from where you can manage the VPN servers, users and all other settings and this makes it much easier and appealing compared to the terminal version. This interface gets setup automatically on a specific port and can be opened via a self-signed certificate, but self-signed certificates are nowadays a scarecrow for users that don’t know what they are and what the warning in their browser means so to fix that we’ll just use Nginx and Let’s Encrypt.
Therefore considering that Pritunl, Nginx and Certbot have already been installed and that the Let’s Encrypt certificate has been generated under the /etc/letsencrypt/live/server.hostname/ directory I will teach you how to make the reverse proxy work correctly and serve the Pritunl web interface behind the SSL certificate provided by Let’s Encrypt.
NOTE: You must replace server.hostname with your own hostname everywhere as this is provided in this tutorial as an example.
First and foremost we must enable reverse proxy, disable self-signed SSL certificate and define the server port for Pritunl and we do that by running the following command:
pritunl set app.reverse_proxy true, pritunl set app.server_ssl false then pritunl set app.server_port 9700
Then we have to restart Pritunl so that it keeps the new configuration. On most Linux/*BSD systems this is done by running:
service pritunl restart
Now we have to create the Nginx config file that would serve the queries as reverse proxy. We do that by creating a new configuration file called pritunl, or server.hostname or whatever you’d like to call it under the /etc/nginx/sites-enabled/ directory with the following contents:
server {

      listen 443;
      server_name server.hostname;
      error_log /var/log/nginx/vpn.access.log;

      ssl on;
          ssl_certificate /etc/letsencrypt/live/server.hostname/fullchain.pem;
          ssl_certificate_key /etc/letsencrypt/live/server.hostname/privkey.pem;
          ssl_session_cache  builtin:1000  shared:SSL:10m;
          ssl_protocols  TLSv1 TLSv1.1 TLSv1.2;
          ssl_ciphers HIGH:!aNULL:!eNULL:!EXPORT:!CAMELLIA:!DES:!MD5:!PSK:!RC4;
          ssl_prefer_server_ciphers on;

        location / {
                     proxy_pass https://server.hostname:9700/;
                     proxy_http_version 1.1;
                     proxy_set_header Upgrade $http_upgrade;
                     proxy_set_header Connection "upgrade";
                     proxy_set_header Host $http_host;
                     proxy_set_header X-Real-IP $remote_addr;
                     proxy_set_header X-Forward-For $proxy_add_x_forwarded_for;
                     proxy_set_header X-Forward-Proto http;
                     proxy_set_header X-Nginx-Proxy true;
                     proxy_redirect off;
                   }

}
NOTE: Remember to replace server.hostname with your own FQDN.
Once this is set all you need to do is restart Nginx the same way in which Pritunl was restarted (service nginx restart) and if all is well the Pritunl web interface should now be accessible under https://server.name/ and be covered by the Let’s Encrypt SSL certificate.
But this isn’t all, because by disabling the SSL certificate inside Pritunl we’ve made the Pritunl web interface running on port 9700 ditch the self-signed certificate without it being able to inherit the Let’s Encrypt one by default as the Let’s Encrypt SSL certificate was only configured for Nginx. Fortunately there’s a fix (courtesy of @sergeybelove) for this problem too, an ugly fix, but still a good one.
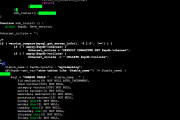
This fix assumes editing the /usr/lib/pritunl/lib/python2.7/site-packages/pritunl/app.py file and replacing the following strings:
server_cert_path = None
server_key_path = None
with the following ones:
server_cert_path = '/etc/letsencrypt/live/server.hostname/cert.pem'
server_key_path = '/etc/letsencrypt/live/server.hostname/privkey.pem'
NOTE: This is a temporary fix as the values get reset each time Pritunl is upgraded and app.py is replaced, however it can be reapplied over and over again as needed.
After applying this basic patch just restart Pritunl again and you should be able to see the Let’s Encrypt certificate working properly when skipping Nginx and going straight to https://server.name:9700.
This tutorial was born after I answered a question on Reddit concerning this setup.

Written by Malin
Self taught IT enthusiast with over 16 years of online background experience. On top of that I'm a blogger, webmaster, husband and father.