Install Lobste.rs on Debian 8
I was in desperate need of a bookmark manager. I tried Shaarli, but it sucks for two reasons. The first one is the use of Sqlite3 database and the second is very thin error reporting and debugging options.
Since I didn’t have the time and the nerves to fix someone’s obsolete code I went ahead and searched using Google for self hosted bookmarking managers. I came across a Github repository full of links to self hosted scripts and among those I found Lobster.rs.
Since I had a Debian 8 server with HaProxy already running for some reverse proxy and firewalling purpose I decided to install Lobste.rs there in order to avoid causing issues with other apps or webserver setups.
Now, you might say that the installation instructions within the Github repo of Lobste.rs are pretty straight forward, but that’s not quite the case. Moreover I wanted to do the install using MariaDB 10 and Let’s Encrypt which implies a different setup from the one listed by default.
First things first. We update and upgrade the system using apt to insure that we got up to date software versions:
apt-get update && apt-get upgrade
Then we need to install Ruby, Rails & Git:
apt-get install ruby rails git
Now that we have all these installed we get MariaDB installed and the library needed to use RoR with it. To install MariaDB we just need to issue the following commands (up to date instructions can be found here):
apt-get install software-properties-common
apt-key adv –recv-keys –keyserver keyserver.ubuntu.com 0xcbcb082a1bb943db
add-apt-repository ‘deb [arch=amd64,i386,ppc64el] http://tedeco.fi.upm.es/mirror/mariadb/repo/10.1/debian jessie main’
apt-get update
apt-get install mariadb-server
Throughout the install process you’ll be asked to set the root password so make sure that you’ve set a strong one.
Now in order to make sure that the mysql2 gem gets the correct MySQL client library version installed we must install the libmariadbclient-dev package:
apt-get install libmariadbclient-dev
Next, because we also need SSL support we’ll be installing the libssl-dev package:
apt-get install libssl-dev
To spare time and resources you can also install the packages together as it doesn’t matter.
Once everything is installed we can begin with installing Lobste.rs and the first thing we need to do is to switch to the directory where we want to place Lobste.rs. I chose my homedir:
cd /home/blackhat
Then we can follow the instructions on the official repo to install:
git clone git://github.com/jcs/lobsters.git
cd lobsters
This will clone the Lobste.rs repo and we can start compiling the gems next by executing one simple command:
bundle
If all was installed properly prior to cloning the repository then we shouldn’t get any errors through this step. If you run everything as root you’ll be warned of potential issues and I strongly advise against running everything as root unless you know what you’re doing. Every task listed before the actual install of Lobste.rs needs to be done as root, it’s mandatory, but the rest could and should be executed as any username with shell privileges.
Once the gems are compiled we can move onto creating our Lobste.rs MySQL database. First we should login using the MySQL root password (which we’ve set when MariaDB was installed). Execute this command and you’ll be prompted for the password:
mysql -u root -p
After the password is entered correctly you’ll be taken to the MySQL console and you can now execute commands via MySQL. There are three steps to take in order to create the database:
- Create the database using: CREATE DATABASE lobsters_db;
- Create the username using: CREATE USER ‘lobsters_usr’@’localhost’ IDENTIFIED BY ‘some-password‘;
- Add the user to the database: GRANT ALL PRIVILEGES ON lobsters_db.* TO ‘lobsters_usr’@’localhost’ WITH GRANT OPTION;
NOTE: Replace “some-password” above with a password of your choice and make it strong!
To sync the changes and make them active just run in the MySQL console: flush privileges;
Then exit the console using: quit
Back in the Linux shell we continue with the Lobste.rs install instructions and create the config/database.yml file with the following entries:
development:
adapter: mysql2
encoding: utf8mb4
reconnect: false
database: lobsters_db
host: localhost
username: lobsters_usr
password: some-password
test:
adapter: sqlite3
database: db/test.sqlite3
pool: 5
timeout: 5000
The database and username values must be consistent with those created via the MySQL console, while “some-password” must be the same password as you set for the MySQL username via the MySQL console. Also because the install of MariaDB does not use the Linux socket by default, but actually the hostname/port configuration we’ll be replacing the “socket:” value in the original install instructions with “host:”.
We continue with the official instructions, but we prepend “bundle exec” before each rake command as it won’t work otherwise:
First we load the schema into the database:
bundle exec rake db:schema:load
Next we create a randomly generated key:
bundle exec rake secret
And we create a file called config/initializers/secret_token.rb with the following contents:
Lobsters::Application.config.secret_key_base = ‘your random secret here‘
NOTE: Replace “your random secret here” with the key generated earlier!
Now we have to create another config file called config/initializers/production.rb where we define the site title and the domain name to be used:
class << Rails.application
def domain
“example.com”
enddef name
“Example News”
end
endRails.application.routes.default_url_options[:host] = Rails.application.domain
Once this is completed all we have to do is to seed the database so that we get a default username, password and tag created:
bundle exec rake db:seed
The output of executing this command should be as follows:
created user: test, password: test
created tag: test
So far so good, now all that’s left to do is to get the Rails server running by executing:
rails server
The server should now start and the Lobste.rs will be available on port 3000. Just fire up the domain you’ve set followed by port 3000 in a browser and you’ll get to the homepage of Lobste.rs. Login using username test and password test and by clicking the username you can set your profile to whatever you like.
Because we want the Rails server to be running in case we reboot we move onto cronjobs as we have to create 3 cronjobs, two for Lobste.rs and one for Rails:
*/20 * * * * cd /home/blackhat/lobsters && env RAILS_ENV=production bundle exec rake ts:index > /dev/null
*/5 * * * * cd /home/blackhat/lobsters && env RAILS_ENV=production sh -c ‘bundle exec ruby script/mail_new_activity; bundle exec ruby script/post_to_twitter’
@reboot cd /home/blackhat/lobsters && rails server
To insert these cronjobs just run: crontab -e
Edit the user’s cron file by pasting the crons listed above and save. Make sure that you set the path to the Lobste.rs install correctly.
To keep things simple for those wanting just the basic install I will stop here and will do a different tutorial for HaProxy, Let’s Encrypt, inserting tags and styling.
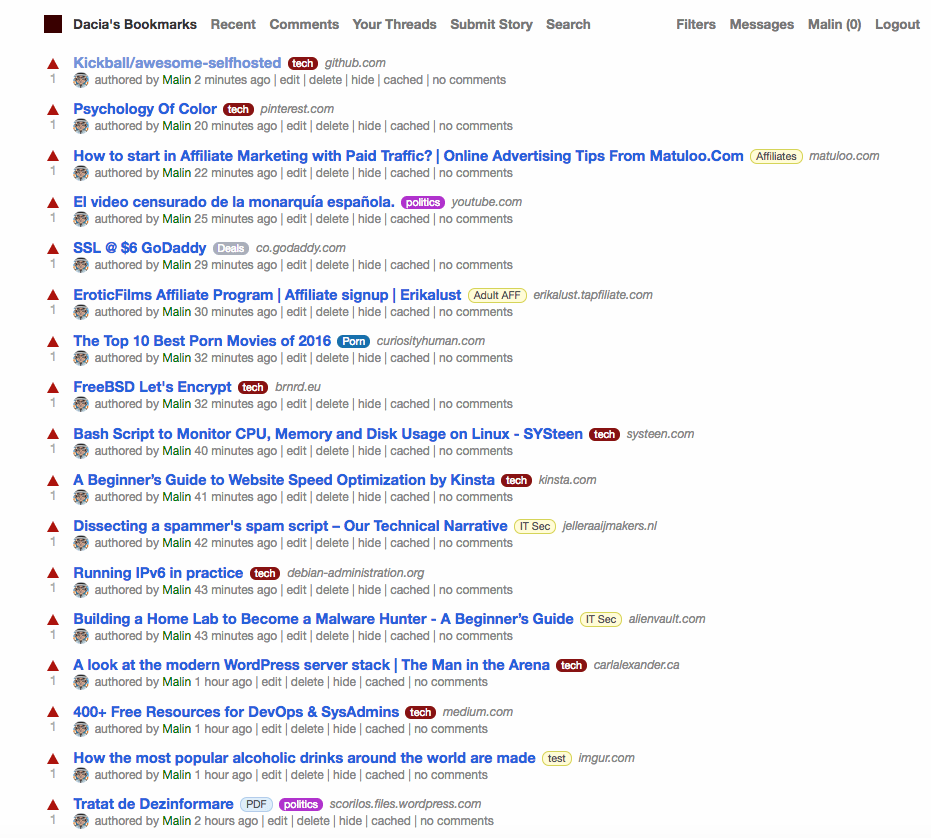
A screenshot of what you’ll get after filling in your bookmarks can be found below:


![[Tutorial] Pritunl with Nginx reverse proxy & Let’s Encrypt](https://www.blackhat.pm/wp-content/themes/sensational/images/relthumb.png)
