[Tutorial] Secure the vestaCP admin panel better
Someone asked on r/Linuxadmin about setting up Let’s Encrypt certificates on the vestaCP admin panel and because I sought a solution for this before and also increased the security of my vestaCP panel by doing additional tweaks I’ve decided to write this article in order to help out all of you that run vestaCP and require a higher security profile for it.
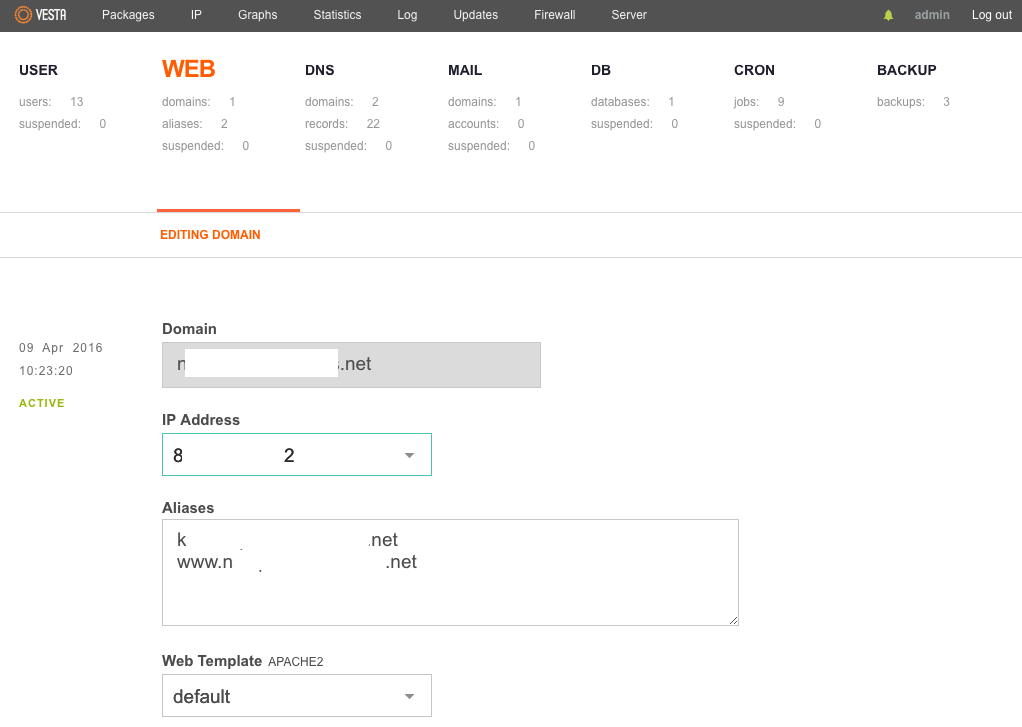
First and foremost we’ll dive into setting up Let’s Encrypt for the hostname(s) running for the vestaCP panel. To do that just access the admin panel, select the “web domain” under the admin username and click on Edit:
 Once inside the editing page make sure that you have all hostnames you’re using setup as aliases, including the www. alias for the main domain/hostname and that they also show in the DNS zone correctly.
Then if everything is setup correctly for the aliases just scroll down on the editing page and enable SSL with Let’s Encrypt, then Save the new settings:
 This will generate a SSL certificate for the main domain/hostname and all it’s aliases and restart vestaCP to inherit the new SSL certificate. Next if you will visit your hostname and aliases via standard HTTPS in your browser you should see them to be covered by the Let’s Encrypt certificate further, however this does not make the SSL work automatically on port 8083 which is where vestaCP runs.
To make it work we need to edit the /usr/local/vesta/nginx/conf/nginx.conf file and replace the following lines:
ssl_certificate /usr/local/vesta/ssl/certificate.crt;
ssl_certificate_key /usr/local/vesta/ssl/certificate.key;
with the following:
ssl_certificate /home/admin/conf/web/ssl.nxxxxxxx.net.pem;
ssl_certificate_key /home/admin/conf/web/ssl.nxxxxxxx.net.key;
NOTE: Make sure to replace nxxxxxxx.net in the sample above with your own main domain.
Next, to enhance the SSL encryption even more we could also replace the following lines:
# SSL PCI Compliance
ssl_protocols TLSv1.2 TLSv1.1 TLSv1;
ssl_ciphers EECDH+AES128:RSA+AES128:EECDH+AES256:RSA+AES256:EECDH+3DES:RSA+3DES:!MD5;
ssl_session_cache shared:SSL:10m;
ssl_prefer_server_ciphers on;
with the following (courtesy of cipherli.st):
ssl_protocols TLSv1.2;
ssl_prefer_server_ciphers on;
ssl_ciphers "EECDH+AESGCM:EDH+AESGCM:AES256+EECDH:AES256+EDH";
ssl_ecdh_curve secp384r1;
ssl_session_cache shared:SSL:10m;
ssl_session_tickets off;
ssl_stapling on;
ssl_stapling_verify on;
resolver 8.8.4.4 8.8.8.8 valid=300s;
resolver_timeout 5s;
add_header Strict-Transport-Security "max-age=63072000; includeSubDomains; preload";
add_header X-Frame-Options DENY;
add_header X-Content-Type-Options nosniff;
You can replace the resolver IP’s above with two of your choice as I used Google’s DNS resolver IP’s for reference.
Now if your server is private just like my own and should not be access by anyone else except yourself then you can go a little paranoid when setting up access for vestaCP and you can set IP restrictions to block all access to the vestaCP panel except from your own IP.
To do that locate the following code (which is right below the SSL certificate directives):
location / {
expires max;
index index.php;
}
and replace it with the following:
location / {
expires max;
index index.php;
error_page 403 = @deny;
allow 123.123.123.123;
deny all;
}

location @deny {
return 301 http://www.somedomain.com/forbidden.html;
}
Remember to replace 123.123.123.123 with your own IP and feel free to add as many allow rules as you wish in order to allow multiple IP’s.
Also create a 403 page and replace https://www.somedomain.com/forbidden.html with your own URL to the page where all the failed queries should be redirected. If you wish you can create a page that would capture the IP’s and referring queries for your documentation.
That would be all, if any of you has some more or better ideas please let me know.


