SSH honeypot on Debian with Kippo
I had an idle cloud server from Cloudatcost.com and I decided at some point to setup a honeypot on it. So I started with SSH and found this tutorial on Kippo which is outdated and because it’s only partly useful I’ve decided to write my own installation tutorial for those willing to install Kippo on Debian.
First thing first as always would be to update the repo headers and do software upgrades if needed by running this command string:
apt-get update && apt-get upgrade
Once everything is up to date we’ll need to alter the default SSH port to a different one so that we can install and setup Kippo to listen on port 22 where all the SSH attacks come.
To alter the port simply edit the /etc/ssh/sshd_config file and replace 22 with the port of your choice.
After doing so you’ll need to restart the SSH daemon and you can do so with this command:
service sshd restart
This should not kick you out of your SSH session, but if it does just log back in using the new port you’ve set in the config file.
The next step would be to install the dependencies and Git in order to be able to install Kippo properly and we can do that with the following command string:
apt-get install python-dev openssl python-openssl python-pyasn1 python-twisted git
NOTE: The original tutorial references installing subversion in order to pull Kippo, but it also references pulling the code from Google Code which has been dead for some time now so we’re going to install Git in order to clone Kippo from Github.
Once the dependencies are installed we’ll have to setup a limited access for Kippo to run under since we don’t want to give attackers direct root access under a successful bruteforce right? So to setup the username correctly we’ll have to execute the following command string:
useradd -d /home/kippo -s /bin/bash -m kippo -g sudo
Now, because by default under a POSIX environment only root can run ports below 1024 we’re going to have to use AuthBind to allow the kippo user to use port 22. Therefore we install AuthBind using the following command string:
apt-get install authbind
Then we create a new file for port 22:
touch /etc/authbind/byport/22
And we setup correct ownership and permissions for this file so that we may allow the kippo username to access it properly:
chown kippo /etc/authbind/byport/22
chmod 777 /etc/authbind/byport/22
Once we made it this far we’re going to install Kippo from Github as mentioned in the note above. For that we switch from the root username to kippo and navigate to it’s own directory:
su kippo; cd
Once in the home directory of the kippo username we do a Git clone:
git clone https://github.com/desaster/kippo.git
The command above will clone the Github repository of Kippo into a directory called kippo so we jump into that directory for further configuration:
cd kippo
Next, we move the default config file to production and we alter the listening port for it:
mv kippo.cfg.dist kippo.cfg
Once you executed the command above you can open the kippo.cfg file with your favorite editor and change the value of ssh_port to 22 (default value is either 2222 or 2217).
Now, before running Kippo we’ll have to insure that it’s startup script uses AuthBind and to do that we’ll have to edit the script called start.sh (using your favorite editor of course) and replace the following line (usually the last one in the script):
twistd -y kippo.tac -l log/kippo.log –pidfile kippo.pid
with this line:
authbind –deep twistd -y kippo.tac -l log/kippo.log –pidfile kippo.pid
You’ve probably noticed that I didn’t give specific instructions for editing and/or saving of the files as in the original tutorial and that’s because whoever attempts something like this and understands what a honeypot is and how it works cannot be an idiot so it’s clearly absurd to write such a tutorial and explain certain aspects such as file manipulation in an idiot-proof manner.
Starting Kippo in the background is as easy as executing the start.sh script in your terminal and as soon as you start it and give it a few moments it will start populating the /home/kippo/kippo/log/ file with logs of bruteforce attacks on your SSH daemon.
For live logging just do a basic tail -f or the log file as follows:
tail -f /home/kippo/kippo/log/
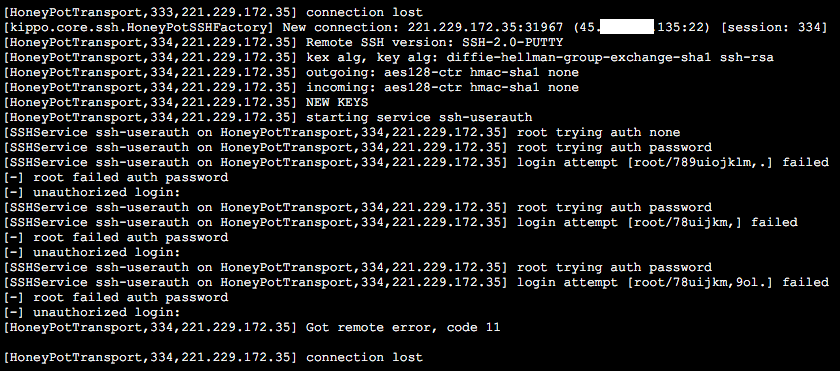
This will output something like the snippet below which shows the source and destination IP’s and ports (my destination IP is partially blanked out for obvious reasons) along with the attempted
The vast majority of the attacks will try pretty basic passwords, but there are some attacks, like the one referenced above, which will try much more complex passwords.
For continuous logging you can create a simple basic cronjob to detect if Kippo is running and if it isn’t to start it in the background and you can just as well setup an init script to start Kippo at boot time.
Simply logging the bruteforce attacks with Kippo is good for analyzing the most common sources of attacks and/or credentials used and also a good way to create your very own weak password database, but if you want to max out the SSH honeypot you can also install some keylogging and sniffing tools and setup the root password to a weak one which would allow an attacker access to the server. This way using the sniffing and keylogging tools you can easily monitor his behavior along with the way he acts, the tools he uses and the interests he has with your server. This way you can profile attacker behavior and be one step ahead of them in the event you’re hacked with an exploit such as dirtyc0w.


